THE PANIC INSIDE
The Panic Inside is a 3D animated short film produced as a graduation project at the Animationinstitut of the Filmakademie Baden-Württemberg.
With a runtime of eight and a half minutes, the film was developed over a two-year period, including eighteen months of full 2D and 3D production.

SYNOPSIS
Jacob, a relentless people-pleaser, collapses from exhaustion and rises into a higher realm. There, a dark, intimidating being, the one who always has to repair the damage stress does to Jacob's body, forces him to heal himself. Back home, Jacob says no to a favor and finally feels free.
TRAILER
BREAKDOWN
FILM STILLS


STORY
Our director, Matthias Strasser, developed the story over several months. It began as a conversation between a film student struggling with drug abuse and searching for meaning in his life, and a god or however one might define that person, being, or energy that may exist somewhere out there.
The story was influenced by elements of Buddhism as well as the short story "The Egg" by Andy Weir. Over time, the tone shifted from a rather serious conversation to a more humorous, sitcom-like approach.
For a long time, there was the problem that the main character lacked a clear issue that could drive the story. To address this, Matthias turned inward and drew from his own experiences, which led to the central conflict: the protagonist being a people pleaser. This required restructuring the entire story around that concept.
At the same time, the god figure evolved, from an abstract presence into a mentor, and eventually into a part of the protagonist himself, helping him to finally say no.
Towards the end of the writing process, our producer Sabina Stöckler joined to bring in additional humor and help resolve remaining plot holes and issues in the story’s logical structure.

The next step was creating a first central image to define the story and establish the visual direction of the film. This approach was recommended by our mentor Andreas Hykade, and having it early on proved extremely valuable. It provided a strong visual reference that made it much easier to communicate our ideas and attract people who were interested in contributing to the project.
At the same time, it served as a central anchor throughout development, something we could consistently return to in order to compare, refine, and stay aligned with the core vision.
STORYBOARD
The storyboard process was a lot of fun. It was Matthias' first time working with a storyboard artist, and with Melanie Schnaidt it couldn’t have been a better introduction. Working together in person, rather than online, made a huge difference. They were able to sit side by side, point things out using figurines or their phones, and even stage moments themselves to explore the scenes.
One of our main goals was to visually “pen in” the protagonist during the opening montage, keeping the framing tight and constrained, so that we could gradually open up the frame later as he begins to feel more free.
At a certain point, Melanie started assigning colors to different beats in the storyboard to enhance the emotional rhythm of each scene. This not only helped communicate the intended feeling while watching, but also became a strong foundation for the later color script process. Additionally, color-coding the characters made it very clear who we were focusing on at any given moment, even though there are only two characters.
The most challenging part was planning a continuous shot in 2D inspired by Masanobu Hiraoka’s style. That sequence went through the most iterations, as we constantly balanced logical staging and anatomical clarity with stylistic expression and visual aesthetics.


ANIMATIC
Creating the animatic could have been relatively straightforward, but due to multiple story revisions, around five major changes, Matthias ended up producing roughly 200 versions.
The sequence that worked almost immediately was the opening montage. Its momentum, combined with the music, gave it a strong sense of rhythm early on. In contrast, the dialogue sequence proved to be the biggest challenge. While it’s often said that writing and editing dialogue are two very different processes, we underestimated just how much the smallest nuances can affect timing and impact.
Another major task was finding the right flow for the 2D sequence, which required a lot of iteration. Matthias also placed strong emphasis on integrating sound design and temporary music as early as possible, as both can fundamentally shape the rhythm of a scene.
Additionally, it was extremely helpful to combine the layout cut, animation references, rough and polished animation cuts, and the liquid art color script into a single working file. This allowed for better consistency and a clearer overview throughout the process.


CONCEPT ART
For the concept art phase, Melanie, Cristina Narata, and Matthias revisited earlier designs that had initially been created quickly to establish the central image, refining them so they would also work effectively in 2D.
Melanie focused on making Jacob animatable in 2D, breaking him down into simple, clear shapes that would be easy to handle in animation. Cristina concentrated on bringing the 2D sequence to life by studying the anatomy of the organs and body parts featured in the film. She also began introducing color at this stage and established the color script for the 2D sequence.
The textures for Jacob and Theo were developed by Matthias, drawing heavily from fine art references, particularly Cubism.


COLOR SCRIPT
The color script was created by Marie Römer. Early on, the overall color arc was clear: a cool blue palette reflecting Jacob’s mental state and his sense of being confined, transitioning into a warm orange by the end, when he learns to say no and begins to feel free.
The more challenging part was defining the look of the higher dimension where Jacob interacts with Theo. Since both the technique and visual style were still evolving, it was difficult to establish a clear color direction at first. However, the idea of representing this space as liquid art was present from the beginning, and we wanted the colors to directly reflect the emotions experienced by the characters and, in turn, by the audience.
We ultimately chose an intimidating red for the beginning of the scene, shifting into a melancholic blue toward the middle and end to evoke a sense of pity for Theo. Due to the fluid nature of the liquid art approach, the color script also had to be developed on a per-shot basis for this sequence.


LOOK DEVELOPMENT
Early on, it became clear that the visual style should directly reflect the character’s emotional state and that this should always be the top priority visually. It quickly emerged that a rough, painterly approach would suit this best. We looked at a wide range of fine art references, especially Cubism, as well as concept art from films with a similar aesthetic, such as Puss in Boots: The Last Wish and Teenage Mutant Ninja Turtles: Mutant Mayhem, whose mood and stylization we found particularly inspiring.
A lot of research went into finding ways to automate or procedurally generate this kind of look. However, we eventually realized that there is no real shortcut, you simply have to paint as much as possible. As is often said, it’s the small imperfections and irregularities that give the style its character, and those are difficult for a computer to replicate convincingly.
As mentioned before, the textures are heavily inspired by Cubism, as well as the slightly crooked, imperfect styles seen in similar films. Much of the lighting and shadow information is painted directly into the textures. A light direction coming slightly from above proved to work well in most situations, providing a strong painterly base right out of the box. On top of that, lighting was still rendered realistically.
To avoid a typical CGI look and push the painterly quality further, we reduced realism by disabling specular and diffuse reflections, subsurface scattering, coat, and other physically based shading components. In addition, overpainting was often necessary, especially in close-ups, to refine details or enhance elements in the foreground and background.


BRUSHTROKE SCATTERING TOOL
Goal
Since the backgrounds needed to work with moving cameras, I created a tool that allows more or less realistic 3D environments to be rendered as images that feel painterly and stylized.
Approach
-
Built an outdoor scene using Megascans models and textures.
-
Rendered the scene realistically, including haze and atmospheric detail.
-
In Nuke, denoised the renders, removed fireflies, and converted them to the correct color space.
-
In Houdini, used the 3D models as a base to scatter hair/curve primitives on top of them.
-
Used Guide Advect to drive the curves into directional flow patterns, creating Van Gogh–like strokes.
-
Projected color information from the realistic render onto the curves using camera-space data and the original meshes.
-
First transferred the color to the original mesh, then from the mesh onto the curves, ensuring the strokes inherit the correct surface color rather than background elements.
-
The curves automatically face the camera in Arnold.
-
Increased curve thickness and applied brushstroke alphas to shape the strokes.
-
Adjusted stroke size and density based on camera distance.
-
Assigned different IDs to vary brushstroke types per object (e.g., trees vs. street surfaces).
-
Finished the look in Nuke by applying a Kuwahara filter.


Panic Attack
For the panic attack, I also used the brushstroke scattering tool and modified it so the strokes appear through noise and flicker aggressively. This time the colors were picked from the objects textures directly.
ROUGHEN EDGES TOOL
Goal
The goal was to create an edge-roughening tool to give the renders a more painterly feel through irregular, rough edges. These bumps and valleys should follow the model’s surface like a displacement map, but without using an actual displacement map, similar to DreamWorks’ CEO tool used in Puss in Boots: The Last Wish or the Flair renderer for Maya.
Approach
-
Start with the geometry whose edges need to be roughened.
-
Measure the distance from the geometry to the camera.
-
Inflate the model based on its distance from the camera.
-
Calculate screen-space normals in Houdini and write them onto the points.
-
Render the screen-space normals as a custom render pass (since Arnold for Houdini does not provide a native screen-space normal pass).
-
In Nuke, apply noise to the model using an STMap.
-
Perform edge detection using the Cryptomatte pass.
-
Mask the screen-space normals with the edge mask.
-
Use the result to drive an additional STMap to displace the image along the edges.
NORMAL CONVERTER TOOL
Goal
The goal was to achieve a chipped wood look on the model, since the rendered surface had a clear gradient from bright to dark across the mesh. The model should feel like it truly has the dimensionality of the painted details. Using a displacement map would have been excessive, so I solved it by manipulating the normals instead.
Approach
-
Use Substance Designer as the main tool.
-
Input the base color map.
-
Use Substance Designer’s color-based masking tool to detect individual colors and automatically separate them into distinct islands.
-
Determine the center points of these islands.
-
Sample the corresponding colors from a world-space normal map at those center points.
-
Flood-fill each island with the sampled normal information.
-
Convert the resulting world-space normal map to tangent space.
-
Use the generated tangent-space normal map for rendering.


BRUSHSTROKE VOLUME TOOL
Goal
-
Reduce visible gradients in volumetric renders to achieve a more painterly look.
-
Replace smooth volume shading with stylized brushstroke-based depth.
Approach
-
Render the volume as a separate pass.
-
Scatter brushstroke cards in 3D space.
-
Rotate the cards to always face the camera.
-
Remove cards that intersect or are too close to geometry.
-
Use a the trail node to stabilize the brushstrokes so they remain consistent throughout the shot.
-
In mostly static shots, render a single frame for the brushstroke pass.
-
In moving shots, create the effect of traveling through floating brushstrokes.
-
Combine the volume render and brushstroke pass in Nuke.


TEXTURE BOMBING TOOL
Goal
To add more surface detail to the geometry and achieve a more painterly look, I was inspired by NVIDIA’s GPU Gems article on Texture Bombing. The objective was to recreate this technique entirely inside Nuke.
Approach
-
Rebuilt the texture bombing technique directly in Nuke.
-
Used only native Nuke nodes, with almost no Python.
-
Developed a system to randomly scatter multiple textures across UV space.
-
Enabled randomized color, rotation, and scale per instance.
-
Allowed up to 10 layered instances to increase texture density and variation on the model.


OVERPAINT TOOL
Goal
To further enhance the painterly look, especially in close-ups such as hands, I developed an overpaint tool. The first version was built in Nuke, but since it proved too limited, I rebuilt the system in Houdini for better control and stability.
Approach
-
Export a frame from Nuke.
-
Overpaint the image in Photoshop.
-
Export the overpainted image as a PNG and import it into Houdini.
-
Subdivide the geometry and generate camera-space UVs on the points.
-
Mask the front-facing geometry.
-
Specify the frame that was overpainted.
-
Transform the geometry of the current frame into UV space while keeping it in 3D space (creating a “wall” of UVs).
-
Perform the same UV-space transformation on the geometry from the overpainted frame.
-
Transfer the UVs from the painted frame to the current geometry.
-
Use the transferred UVs to project the overpainted image onto the geometry.
The result is that the overpaint adheres to the animated geometry and moves naturally with it.
MOTION BLUR SMEAR FRAME TOOL
Goal
To push the painterly look even further by stylizing motion, I developed a smear-frame tool based on motion blur data.
Approach
-
Adapted Matt LaVoy’s brushstroke scattering tool to work with Arnold’s motion vector pass.
-
Used motion vector intensity to drive the size of the brushstrokes, the brighter the values, the larger the strokes.
-
Brushstrokes appear only where motion is present in the frame.
-
Rotated the brushstrokes according to the direction derived from the motion vector pass.
This creates painterly smear frames that enhance motion and integrate naturally into the rendered image.

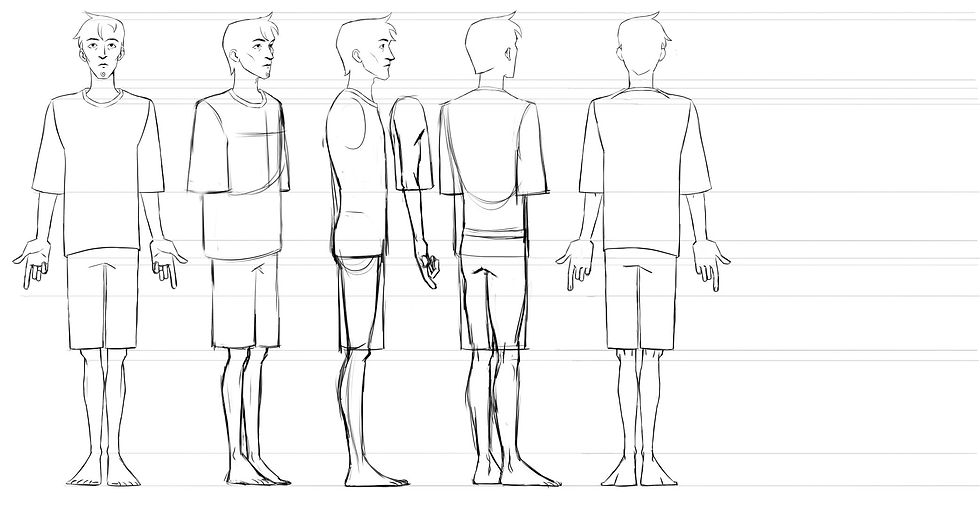
3D ANIMATION
Our lead animators were Melanie Schnaidt and Minja Caesar.
To ensure consistency across the team, we created an animation bible outlining the overall animation style, character behavior, and workflow. In addition, we built an extensive animation library that served as a shared reference for poses, movements, and performances, helping to maintain a cohesive look across different animators.


To support the film’s rough, painterly aesthetic, the animation itself was designed to feel equally raw and expressive. The body animation is snappy and deliberately rough, built on a clear pose language with exaggerated timing and spacing to enhance impact and energy. Most of the film was animated on twos, with intentional shifts between ones and twos to emphasize the characters’ emotional states within each scene.
A strong focus was placed on emotional performance, particularly through subtle facial expressions and micro-expressions, to convey feelings convincingly and make the characters more believable.
Rigging and animating Theo’s hands proved especially challenging. We developed a dedicated character guide specifically for his hands to define their appearance and behavior depending on his emotional state.
And of course we needed a lot of reference material, especially for the action shots and the emotional performances
2D ANIMATION
The most challenging aspect of the 2D animation was combining the sharp, punchy body dynamics with the constantly shifting, liquid-like animation inspired by Masanobu Hiraoka, all within a continuous oner. Balancing these two approaches while maintaining clarity and flow required extensive iteration.
To enhance the sense of movement, we used dynamic camera angles and motion lines to emphasize speed and direction throughout the sequence. At the same time, we underestimated how demanding it would be to maintain solid, readable body forms while preserving the rough, expressive style.
Our solution was a multi-step workflow: we first animated the scenes in a rough pass, followed by a clean pass to ensure structure and consistency, and finally added a second clean-up pass to reintroduce controlled roughness and texture into the animation.
2D FX
Levi Köhler, Vadims Ivanovs, and Matthias Strasser were responsible for all 2DFX animation. Thanks to Melanie, they had strong 2DFX layouts to work from, which helped maintain consistency throughout the process.
One of the main challenges was aligning camera shakes and movements animated on ones with 2DFX elements animated on twos. Ensuring that both felt cohesive required careful coordination, and many of these issues were ultimately resolved during compositing.


SOUND DESIGN
The sound design, created by Lukas Huber, plays a key role in shaping the film’s atmosphere, particularly through its abstract, otherworldly “liquid art” sounds. To achieve these sounds, Lukas experimented with unconventional techniques, such as using a violin bow on a cymbal to produce these eerie tones.
Many of Theo’s unsettling bone-cracking sounds were created using an unexpected source: squishing an iceberg lettuce.
Theo’s voice was another particularly interesting element. It was built by layering multiple recordings, primarily the voice of Theo’s voice actor pitched in different ways, combined with lines from Jacob’s voice actor and Lukas himself, all aligned in timing. This resulted in five or six layers blending into an ethereal, otherworldly sound. This approach also allowed the voice to shift subtly depending on Theo’s emotional state, even blending between Theo and Jacob to suggest that Theo is ultimately a part of Jacob.

MUSIC
Alongside the wonderful vocals, guitar work, and compositions by Leon Maximilian Brueckner, the film also features the Four Four Music string orchestra from Sofia and drummer Henning Jung, whose performance gives the film its essential drive and memorability.
Leon managed to translate Jacob’s emotional journey into a soundtrack that shifts effortlessly between very different musical worlds. Along the way, we hear pulsating electronic patterns that push Jacob forward like clockwork, a driving techno track reflecting the failed relationship, a dissonant string orchestra built around glissandi to represent Theo, and an abstract synthesized soundscape that unfolds alongside the morphing organs. At times, the music captures chaos, emotional overload, and inner fragmentation; at others, it creates fragile and contemplative moments in which time seems to stand still. As Jacob descends deeper into his inner self, the music moves with him through increasingly distorted and abstract spaces, eventually culminating in an ecstatic pop song that delivers the film’s surprisingly simple conclusion: “I gotta say no, no, no”, a refrain that lingers after the film is over.
PIPELINE
Goal
Build a robust production pipeline using ShotGrid Toolkit that works across Maya, Houdini, Nuke, Marvelous Designer, and TVPaint.
ShotGrid Toolkit works to a degree out of the box, but it took about a week to fix and adapt the code for our project, updating versions, ensuring compatibility, integrating our project IDs and server structure, and stabilizing the overall setup.

Maya
I started by building layout tools. Some were based on tools originally created by Philipp Dörrer for "The Amazing Kitsuvserse", which I adapted and expanded to fit our project needs.
These include:
-
Tools to import sound
-
Tools to send files from layout to animation and lock the camera
-
One-click rig import tools
-
Animation utilities to switch between animating on 1s and 2s (since about half of the film is animated on 2s)
-
Utilities for toggling specific geometry and controls
Additional integrated tools:
-
Animbot
-
Advanced Skeleton
-
Studio Library
I also modified the publish and local playblast tools that ship with ShotGrid Toolkit:
-
Automatic MP4 conversion
-
Context and artist recognition
-
Automatic HUD overlays with shot information
Alembic export tools:
-
Camera export that scales correctly for Houdini (100x adjustment) and respects transformation hierarchies
-
Automated geometry export to the correct shared location
-
Lead-time handling and morph-to-base-pose setup for cloth simulation

Houdini
Custom tools include:
-
Automatic import of the correct camera, Jacob’s and Theo’s animation, and their clothing
-
Scene assembly handoff to other departments
-
ROP node updating
-
Arnold fixes for rim light behavior

TVPaint
Since there is no standard pipeline solution for TVPaint, I built a custom ShotGrid-style integration using George (TVPaint’s scripting language).
This replicates Toolkit functionality similar to Maya and Houdini:
-
Open/save through ShotGrid
-
Publish/submit
-
Local playblast
-
Import audio
-
Set frame ranges pulled directly from ShotGrid
-
Additional production utilities

Marvelous Designer
Using the Marvelous Designer API, I integrated it into the pipeline:
-
Automated importing/exporting
-
Project-based saving
-
Direct connection to the ShotGrid workflow
Nuke
Created tools to:
-
Automatically import image sequences
-
Set frame ranges from ShotGrid
-
Provide general pipeline automation and shot setup tools
TEAM


Matthias Strasser
Director, Writer, TD, LookDev, Character Art, Lighting, Comp
Melanie Schnaidt
Lead Animation
Minja Caesar
Lead Animation
Sabina Stöckler
Producer
Pauline Petit
3D Animator
Eileen Kammer
3D Animator
Leo Pflug
3D Animator
Lasse Falk
3D Animator


Sasha Wiese
3D Animator
Justine Girault
3D Animator
Ipek Baykal
3D Animator
Viktoria Knudsen
2D Animator
Leo Neumann
2D Animator
Nils Kuhl
2D Animator
Anna Folz
2D Cleanup
Levi Köhler
2D FX


Vadim Ivanov
2D FX
Cristina Narata
Concept Art
Marie Römer
Color Script
Nicolas Sperling
Background Artist
Lennart Bachnick
Color Grading
Leon M. Brueckner
Music
Lukas Huber
Sound Design,
Re-recording mixer
Marc Landendinger
Re-recording mixer


Damon Webb
Theo's Voice Actor
Daniel S. Smith
Jacob's Voice Actor
Jonathan Nyberg
Dude's Voice Actor
Aike Münzenmay
Additional 3D Animation
Emanuel Strehler
Additional 3D Animation
Emely Michel
Additional 3D Animation
Cyril Fischer
Festival Coordination
These four core team members took on multiple roles, three of whom also graduated with this film:
Matthias Strasser
Director, Technical Director, LookDev & Character Artist
Melanie Schnaidt
Lead Animation, 2D Animation
Minja Caesar
Lead Animation, 3D Animation
Sabina Stöckler
Producer
This project would not have been possible without the support of many talented artists who contributed along the way. In total, around 30 people were involved, with up to 20 working simultaneously during the most intensive production phases.
The team consisted entirely of students, primarily from the Filmakademie, but also from Gobelins, MoPA, and The Animation Workshop. We are deeply grateful to everyone who helped bring Jacob and Theo to life. And thank you to all the mentors, who not only encouraged us, but also helped us stay focused and to everyone at the Animationinstitut for their support.
© 2026 | Matthias Strasser